Introduction
Policies are applied with settings to help you manage and monitor your applications better.
Click on the Policies icon to enter the Policies page.
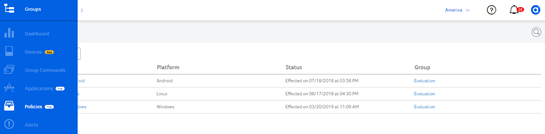
On the Policies page, you will see a list of your policies with the Platform, Status, and Group they each belong to. The Status informs the date the policy was put into effect.
Click on a Policy Name to enter its Policy Profile page.
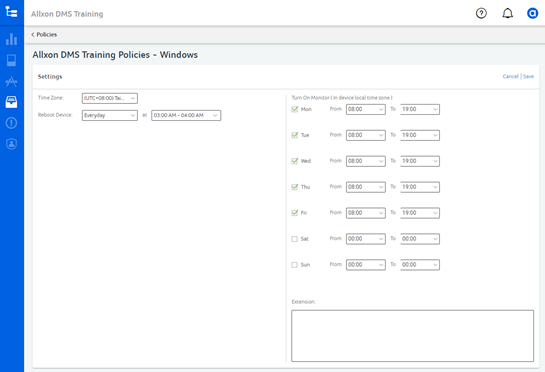
On the Policy Profile page, you can Edit the policy Settings. Click on Edit to change the times for rebooting your device according to your preferences. Click Save to implement the new changes, then exit the editing mode.

You can also modify the Policy Extension section by editing or assigning commands to your device, such as “Disable Window Update.” Click on Save to implement the changes. The new policy settings will be ready for use in the group.
Once you have saved all the policy content changes, click Submit to apply the latest policy settings to your devices.
💡 Note
Changes will not be saved if you click Cancel or “X”.
1. Software Watchdog Settings
Allxon Software Watchdog is a very useful feature that helps minimize operation downtime. Software Watchdog monitors your applications and ensures that unexpected system crashes are immediately attended to and automatically fixed by remotely relaunching the application.
Follow the steps to set up Software Watchdog on Windows, Linux, and Android:

- Windows / Linux
- Click on “+”
- Fill in App Name (name of application) and App Path (a viable file path of the application on the device)
- Click Save to save changes.

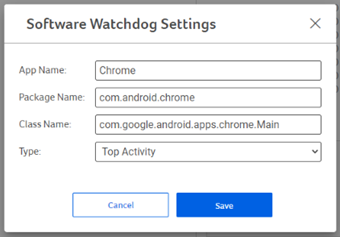
- Android
- Click on “+”
- Fill in App Name (name of application), Package Name (provided by the application provider), Class Name (provided by the application provider), and Type (choose option between: Top Activity, Activity, and Service).
- Click Save to save changes.
2. Collect Logs Settings
Commands can be sent to trigger the Agent to collect logs. The log path format has to be precise for the command to work. For your convenience, you can set up to 5 sets of log settings (with 8 log paths) that command the Agent to collect the logs periodically, or for you to collect the logs manually.

To Add a new setting for collecting the logs, click on “+”
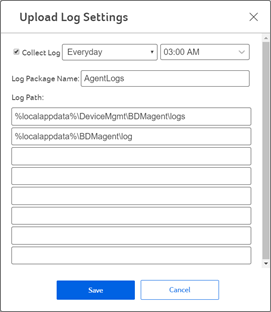
You will be asked to fill in the following details:
- Schedule to periodically collect logs (optional)
<💡Note > If you do not set the periodical schedule, the Agent will not follow accordingly. However, this setting will still be available for you to Get Device Logs Immediately on the Device Profile Page (refer to Get Device Log section under 6.4.2 Remote Device Management).
- Log package name (required)
- Log path (must include at least one path)
- Click Save to save changes
3. Set USB Keyboard and Mouse Lock Settings
Allxon USB Keyboard and Mouse Lock feature is a high security function that prevents hackers from intruding your devices via USB keyboard or USB mouse insertion.

- To protect your devices, Enable this feature by clicking on the Settings icon, to bring up the USB Keyboard & Mouse Lock Settings window.
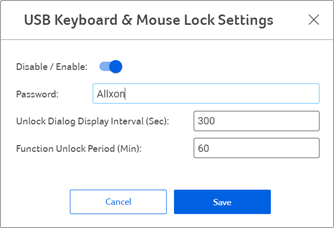
- Disable/Enable: Toggle the switch to Disable or Enable this feature.
- Password: Create a password that will be used to unlock this function on your device.
- Unlock Dialog Display Interval (Sec.): Set the time you would like the Unlock Password window to appear on your device during setup.
- Function Unlock Period (Min.): Set the time you would like the device to be re-locked after the device has been unlocked.
- Click Save to save changes.
- Add an Unlock Device feature onto your device in the Unlock USB Devices List section.
<💡Note > Only a USB keyboard or a USB mouse that is recognized by the operating system can be added to this section for this feature to work.
Click on “+” to bring up the Add Unlock Device window, and fill in the following details:
- Device Name: Create device name.
- PID: Enter the PID of the Unlock USB device.
- VID: Enter the VID of the Unlock USB device.
Click Save to save changes. The new unlock device will appear on your Unlock Devices List section.
