The following OTA service is deprecated. While these functions still operate as intended, newer functions have been created to replace them that are more streamlined and optimized. This deprecated service is expected to sunset on January 31, 2023.
For all new and future OTA projects we encourage using our current OTA service![]() instead of this deprecated ones.
instead of this deprecated ones.
Introduction
The Applications page helps you manage, create, and distribute useful applications to groups on the Portal. You can register or update new or existing applications by configuring installation/uninstallation commands and log paths on Windows installer, Linux, and Android. If you have privileged access, you will also be able to delete applications.
Click on the Applications icon to enter the Applications page.
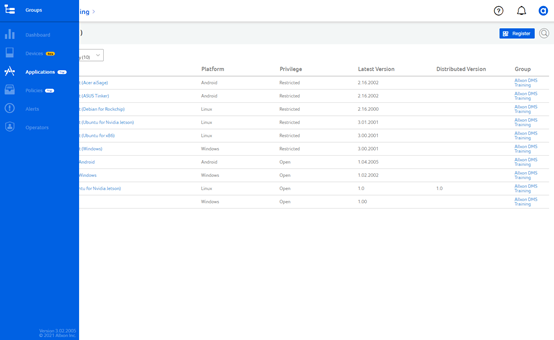
5.1 Register Applications
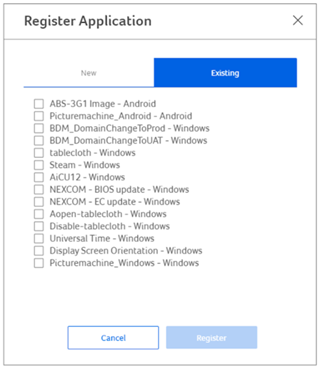
There are two types of applications you can register: Existing Application or New Application.
💡 Note
You will need to have “Register Existing Apps” and “Register Open Apps” in your role to register applications.
To register an application, click on Register.

-
Existing Application
In your parent group, you will find a list of existing applications you can register. Select the application in the Existing tab and click on Register. The application will then appear on your Applications page list.
- New Application
To register a new application, you will first need to acquire an application GUID. The application GUID and package names differ across the three main platforms: Windows, Linux, and Android.
-
Method 1
Obtain application GUID and package name from application provider.
-
Method 2
If you are unable to obtain the application’s GUID and package from the provider, the following tips can help you acquire the details manually. First install the application onto your device, then follow the steps for each platform:
-
Windows
User can self-define the Application GUID by choosing a symbolic name, for example, “Allxon_Application_GUID” if you could not find it on your edge device.
- Linux
Use the following command to open the list of matching applications. This will help provide details of the application package name:dpkg -l | grep <keyword>
-
Android
Enter the File Explorer of the device and follow the path to find the package name of the application:
- Internal Storage > Android > data
-
-
-
Register New Application
With the newly acquired application GUID and package name, you are now ready to register a new application. Fill in the following details in the Register Application > New tab:
- Application Name
- Application GUID
- Platform
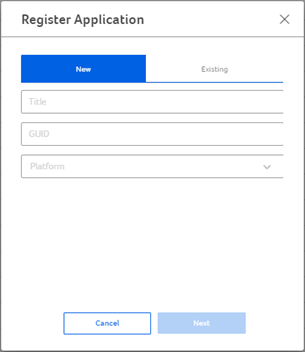
Click Next to proceed.
Once you have registered the new application, it will appear on your Applications page list and all children groups will be able to register it as an existing application. You will also be able to create and release new versions of the application. See 6.5.3 Application Versions.
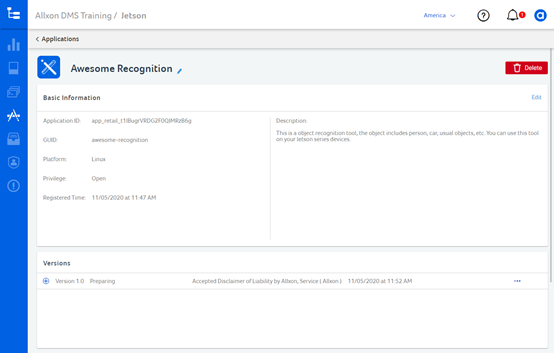
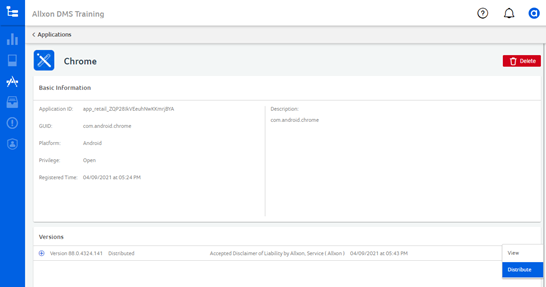
5.2 Application’s Profile Page
The Application’s Profile page provides you with the basic information you need about the application and its latest versions and activities.
To enter the Application’s Profile page, click on an application name on the Applications page list.
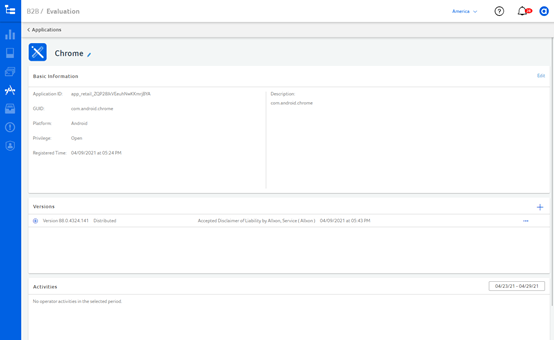
With privileged access, you can edit the application’s title, and basic information. Click on Edit, and Save after you have made the changes, or Cancel to resume with the existing details. Any changes made to the applications will be recorded under the Activities section.
5.3 Application Versions
Once an application has been registered, you will be able to create new versions of the application. The Versions section helps you preparing, released, and distributed new application versions onto your Portal.
The Versions section will appear empty before any new version of the application is created.
- Create Application Versions

To create a new version of an application for your Portal, click the “+” button.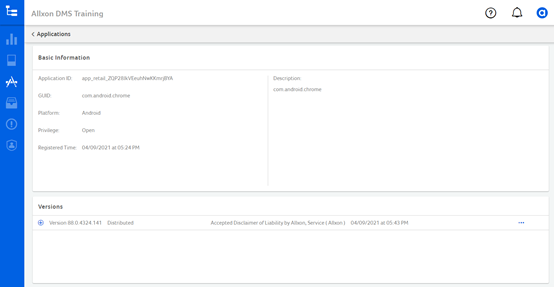
- Prepare
Prepare a new application version according to your application GUID:
-
Windows
- After clicking “+” enter the version number, followed by the installation and uninstallation command.
- Click Upload a File to select the .zip file.
-
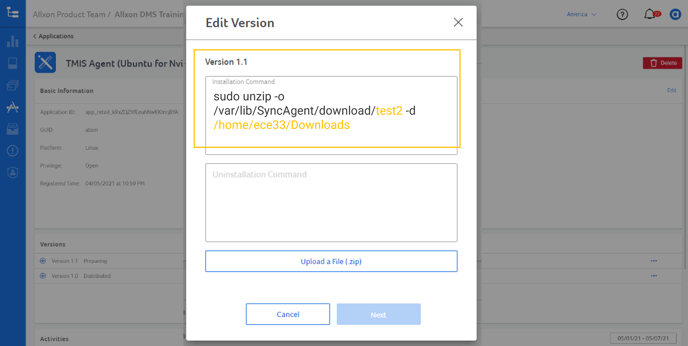
Linux
To prepare a Linux application, add the following command to the beginning of your install command:
sudo unzip -o /var/lib/SyncAgent/download/<App Name> -d <UnzipFolderPath>
- App Name on Portal: User can self-define your App Name on Portal.
(App Name “test2” is provided as an example)
- UnzipFolderPath: The file path of the folder you wish to put the extract files into.
Example of creating an application named “test2” with unzip folder path to be /home/user/Downloads.
- App Name on Portal: User can self-define your App Name on Portal.
-
Android
- Installation Command
To launch the application after installation, please follow the sample command and format below.
am start <package name>/<class name>
<💡 Note > This field is optional. If there is no command entered, the installation will start automatically by using the APK file in the zip file uploaded previously. - Uninstallation Command
Please follow the sample command and format below.
pm uninstall <package name>
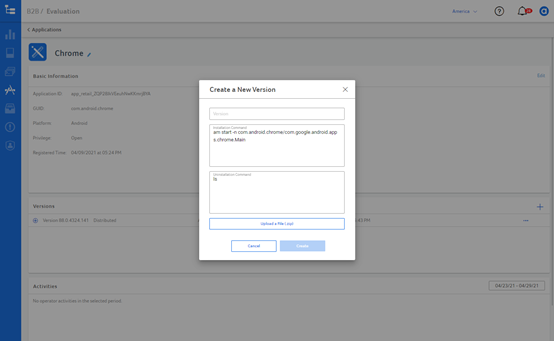
After you have selected the file, click Create to begin file upload, or click on Cancel or “X” to exit.
<💡 Note > Changes will not be saved if you click Cancel or “X”.
Once the file starts to upload, you will see a progress bar with the name of the file and the upload percentage to indicate the uploading progress. If you would like to cancel the file upload, click on “X” and you will be taken back to the previous step.

- Installation Command
-
-
- Release
After the file has finished loading, you will have a new application version ready for release. Click on Release to release the version, or you can edit the description before releasing.
- Distribute
Once you have released the application version, you will be able to distribute the new version to different groups.
Click on Distributed to assign the groups you wish to distribute to. Check and uncheck the boxes to select the groups, then click Distributed to complete the action. You can also choose to set up a distribution schedule for the application to be distributed at a particular time.
<💡Note > Distributing application versions are dependent on the user’s role and access privileges. Once a new application version “of Allxon Agent” has been distributed, users will not be able to revert back to an earlier version. If you would like to roll back to an earlier version, please contact Allxon.
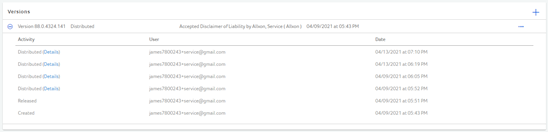
An edit history of the application’s versions will start to appear under the Versions section. All activity will be added to the activity log indicating when an application version was “Created,” “Edited,” “Released,” or “Distributed.”
5.4 Delete Application
If you have privileged access, you will be able to delete an application by entering the Application’s Profile page. To delete an application, it cannot still be distributed to other groups. Only when all groups are clear of the application, the Delete button will appear for you to permanently remove it from your Allxon Portal.
